Grogbuild FreeRange

Loading…

Grogbuild FreeRange
The unbloated build for all.

-

About Grogbuild FreeRange

Starting of as the flashable Grogbuild images for just a few Enigma2 set top boxes, it has now developed to a build that should work on all Enigma2 boxes without the need to flash the box first.

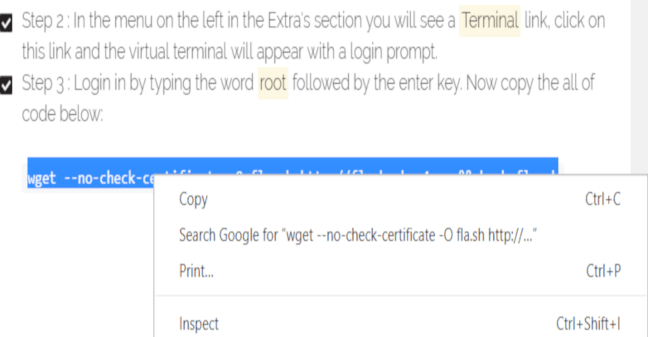
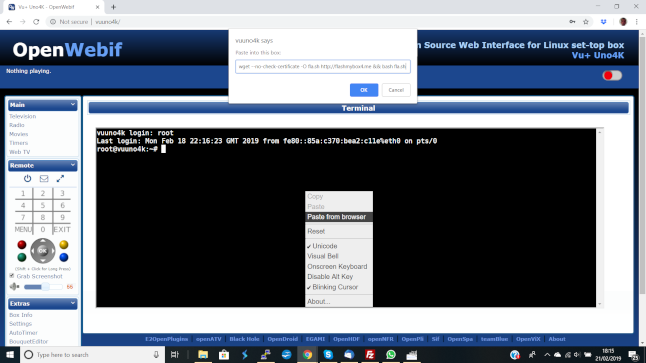
There is no need to dig out a spare USB stick to download the build to and flash from, any Enigma2 set top box that has open ATV installed can install Grogbuild FreeRange by just copying a single command line and when you put it on your Enigma2 box you will get the most upto date plugins at the time, unlike previous builds that may have had old versions installed.

If you like the build then a donation towards the hosting and bandwidth cost for the build files would be appreciated

No USB Stick

Normally with installing a build you need to download it to a spare USB stick and then flash. Grogbuild FreeRange does not need to flash the box first, as long as you have an initialised and mounted storage.

UnBloated

Many builds are loaded up with extra plugins that you only need once or twice, Grogbuild FreeRange not only removes some unnecessary plugins that come with many builds but it also only installs a few additional plugins.

Universal

Normally if you want a build to install on your Enigma2 set top box you need to search for a build that has been built for your specific box. Not any longer, most Enigma2 box can have Grogbuild FreeRange installed and you are given the option to use either openATV OR openVIX as the base image.

Flashes the box for you

When running the setup script for Grogbuild FreeRange, after answering a few simple questions the script will automatically fetch and flash the latest openATV or openVIX stable image for your box, no worrying if if you have got the correct image.


Features

  • Grog68's 'Add a Line' plugin installed
    If you use a line it can be added simply using this plugin, no need to copy files over
  • Grog68's 'Movie Organsisor' Plugin
    Our infamous Movie Organisor plugin used to arrange your tv recordings into folders.
  • Our own top pic script to update top images in the menu's on the Vskin skins.
  • Install with a single line of code
    You just cut the piece of code we give below into the terminal on your box, answer a few simple quetions and sit back and watch.
  • Most upto date at time of flashing
    As the plugins are downloaded during setup they are the most upto date versions at that time, unlike a prebuilt build which could be weeks or months old.
  • Update online via software update
    Utalising the ATV Software Manager you can update the software as often as you like, even our own plugins if we update them.
  • Works with all Enigma2 set top boxes
    As we do not use an image in Grogbuild FreeRange it will install in just minutes on any Engima2 set top box.

Grogbuild FreeRange does not need you to flash your box first, our setup script flashes the box for you, make sure you have an initialised usb stick plugged in and you have a backup of your settings if you need them

Installing Grogbuild FreeRange

We are pleased to say we are the first build installed via command line that does not require you to flash the box with openATV or openVix before installing the build, the GrogBuild Freerange Installation does it for you. Assuming that you have your USB/HDD connected to the box (used for recordings etc) then you can continue to install Grogbuild FreeRange.
  • Step 1 (OpenATV): In your web browser open a new tab in the url bar type http://yourboxname ie if you have a zgemma h2h you would enter the url http://zgemmah2h, for a VU+Uno 4K you would enter http://vuuno4k, and you will see the OpenWeb Interface load up, in the menu on the left in the Extra's section you will see a Terminal link, click on this link and the virtual terminal will appear with a login prompt
  • Step 1 (OpenVIX): Open Vix doesn't have the terminal installed as part of OpenWebIf so you will need to connect to your box by using a telnet program such as Putty. Open Putty and enter the IP address or hostname of your box in the server field and click on OK
  • Step 2 : Login in by typing the word root followed by the enter key. Now copy the all of code below:

    wget --no-check-certificate -O fla.sh http://flashmybox4.me && bash fla.sh

  • Step 3(openATV) : Now in the OpenWeb Interface right click in the terminal window and select paste from browser and in the popup box press CTRL+V to paste the code and then click on OK.
  • Step 3(OpenVIx) : Just right click on the putty window and the code should be pasted into the putty command line.
  • Step 4 : Press the enter key and the installation will now begin and you will be asked if you want to build Grogbuild FreeRange on OpenATV or OpenVIX if openVIX is available for your box (beta)
  • Step 5 : You will now be asked which partition do you want Grogbuild FreeRange installed on. If your box does not have, or you don't want to use Multiboot then just press the enter key.
  • Step 6 :now you are asked if you are in the UK or Ireland (if Ireland then Virgin IE and/or Sky IE are set up instead of UK) and then you can opt to keep your existing line and timers.
  • Step 7 : you will now be prompted to enter a hostname for your box, if you don't want to change the default hostname then just hit the enter key.
  • Step 8 : If you have a cable tuner You will now be asked to enter your cable NetID. Make sure you enter the full 5 digit net id. If not using cable, just hit enter.
  • Step 9 : Step 9: you will now be asked to select your Sky region, enter 0 if you are not using sky or the number next to your region followed by the enter key. You will then be asked to select your Freesat region, as with the Sky region, enter 0 if not using freesat or the number next to your region if you are followed by the enter key.
  • Step 10 : now you are asked if you wish to install the e2m3u2Bouquet Plugin for an iptv subscription, you will then be prompted for the relevant info supplied by your provider.
  • Step 11 : You will now be asked to select the default skin you want to use, enter the number corresponding to the skin you want to use..
  • Step 12 : Sit back and wait for installation to complete. The box will automatically flash either openATV or openVix..
  • Step 13 : (Vix Only) you will be prompted to setup VIX, work through the wizard setting the output as desired and then when prompted if you wish to restore settinhgs select Yes and restore the file Grogbuild_vuuno4k_setup.tar.gz (not your own backup).
  • Step 13 : (ATV only) Go make a cuppa :)
  • Step 14 : Once Grogbuild FreeRange is installed, it does take a few minute,, openVIX will just be sat with the Grogbuild FreeRange boot image displayed and the info bar will pop up, ATV displays the bouquet list (favourites only) so exit out of this until you just have the boot logo displayed.
  • Step 15 : hold the blue button down on the remote until the extensions menu appears and select AutobouquetsMaker Scanner. Once complete type 101 on your remote to get a tv picture..
  • Step 16 : Once the scan has completed, on Open ATV press the green button or on OpenVix hold down the blue button, now select EPG-Importer. Now press the Blue button and select Rytec UK Sat/Virgin XMLTV to open the options and then select each of the 6 options so each box is ticked. Press the Green button to save.
  • Step 17 : Press the Yellow button to run a scan. Select yes when prompted. On the right you will see 'Importing: Rytec xxx' once the importing has finished it will show 'Last Updated' with the date.
  • Step 18 : Press the Exit button and then select Add a Line and you can use this plugin to enter your line details.

Setup

Now the installation has completed it's time to setup

Setting up Grogbuild FreeRange

If you have restored your settings then your box should be ready and you do NOT need to do the following.
  • Step 1 : If your box uses an external usb storage then now is the time to plug it into your box if you haven't already.
  • Step 2 : If your storage device has not been used or initialed on an enigma2 box before then you need to do that now. Press the Menu button on remote and select Setup -> System -> Storage Device -> Initialisation -> YOUR USB DEVICE -> Red Button.
    Once the initialisation has completed, hold the power button on remote until a menu appears and select Restart Gui.
  • Step 3 : Make sure the storage device is mounted correctly by pressing the RED button on the remote and selecting Plugins -> Mount Manager Your storage device should be listed and should say Mount: /media/hdd.
    If it does just press the exit button until you exit the menus, if it doesn't press the Green button to Setup Mounts and using the Left/Right arrows on the remote change the mount until /media/hdd is selected and press the Green button to save. Answer yes if prompted to restart the box.
  • Step 4 : Now we need to just double check your NetID etc is set, if you don't know it check our NetID map and select the Town closest to you. Press the Menu button and select Setup -> Service Searching -> AutoBouquetsMaker->Providers
  • Step 5 :If wanting Freesat (ie no premium channels) change FreeSat UK to Yes and then using the left/right arrows on remote change FreeSatUK Area to the Area you wish to use. Change the bouquet settings for Freesat as you see fit. I personally just have Main bouquet set to Yes (All Channels) with the other bouquet settings set to no.
  • Step 6 : If you have a Satellite Line and want the remaining premium change Sky UK to yes and then set the Sky UK:area to your area, and then again set Sky UK: generate main bouquet to yes(All channels) and as above set the sky uk bouquet options as you want.
  • Step 7 : Now move down to Virgin (UK):Area and using the left/right arrow keys scroll through the list of Net ID's until the one you entered in tuner config above is highlighted. DO NOT change the bouquet options.
  • Step 8 : Press the Green button to save and then press the green button again to run a scan
  • Step 9 : Once the scan has completed, press the exit button 4 times to return to TV picture and then press the green button and select EPG-Importer. Now press the Blue button and select Rytec UK Sat/Virgin XMLTV to open the options and then select each of the 6 options so each box is ticked. Press the Green button to save.
  • Step 10 : Press the Yellow button to run a scan. Select yes when prompted. On the right you will see 'Importing: Rytec xxx' once the importing has finished it will show 'Last Updated' with the date.
  • Step 11 : Press the Exit button and then select Add a Line and you can use this plugin to enter your line details.
Please note the skins where created by Kiddac and if you like them I am sure he would appreciate a donation.


Testimonials

Just some of the comments left by users of Grogbuild

Great build mate. Everything up and running great

Installed on : Miraclebox Hybrid Mini, Edison os mini
and Vu+ solo se
hulkster1974

The best build just got better! Thank you so much for your hard work

Installed on : Zgemma H52tc
Eagle

Migrated from Ipab, this is far better. Many Thanks for your hard work Grog

Anonymous

Video Instructions

Cable Net ID Map

Use the map to find your location and click on the pin nearest to you for the Net ID

Get in Touch